Portobello, Eggplant, and Roasted Red Pepper Panini


Fun & Info @ Keralites.net


Fun & Info @ Keralites.net
Prep Time: 40 Min
Cook Time: 20 Min
Ready In:9 Hrs


Ingredients

2 red bell peppers

4 portobello mushroom caps
1 cup fat-free balsamic vinaigrette

4 (1/2 inch thick) slices eggplant, peeled
1 teaspoon garlic powder
1 teaspoon onion powder
2 teaspoons grated Parmesan cheese

8 slices focaccia bread
1/4 cup fat free ranch dressing
4 thin slices Swiss cheese
4 thin slices Asiago cheese

Directions


1.
Preheat the oven's broiler and set the oven rack at
about 6 inches from the heat source.
Line a baking sheet with aluminum foil.
2. Cut the peppers in half from top to bottom; remove the stem, seeds, and ribs,
then place the peppers cut sides down onto the prepared baking sheet.
3. Cook under the preheated broiler until the skin of the peppers has blackened
and blistered, about 5 minutes. Place the blackened peppers into a bowl,
and tightly seal with plastic wrap. Allow the peppers to steam as they cool,
about 20 minutes.
Once cool, remove the skins and discard. Refrigerate overnight.

4. Place the portobello mushroom caps into a resealable plastic bag,
and pour in the balsamic vinaigrette. Squeeze out excess air, and seal.
Marinate overnight in the refrigerator.
5. The following day, preheat an electric double sided grill
(such as George Foreman grill) according to manufacturers' directions.
Sprinkle the eggplant slices with garlic powder and onion powder.
6. Remove the portobello mushrooms from the marinade, and discard the
remaining marinade.

Cook on the preheated grill until tender 4 to 5 minutes.
Cook the eggplant slices on the preheated grill until tender 4 to 5 minutes.
Remove, set onto a plate, and sprinkle with Parmesan cheese. Set aside.
7. To assemble the sandwiches, spread each slice of focaccia with ranch dressing.
Place a slice of cheese on each piece of bread.
Place the eggplant slices, roasted peppers, and a portobello mushroom onto four of the slices of bread.
Top with the remaining bread.
8. Spray the double sided grill with cooking spray, and cook the sandwiches until
the cheese has melted, the sandwiches are hot in the center,
and the bread is golden brown, 4 to 5 minutes.


ISMAIL CHOHAN

[Read More...]


Strawberry Pudding


Strawberry Pudding

Healthy Cooking For Diabetes from Davita
Portions: 6 | Serving Size: 1/2 cup


Ingredients


1 cup water
1/2 cup Splenda granular sugar substitute
2 cups crushed strawberries
1 Tbsp fresh lemon juice
1 tsp lemon zest
3 Tbsp cornstarch
6 Tbsp nondairy whipped topping

Directions


1. Bring water to a boil. Stir in sugar substitute. Drop crushed
strawberries into boiling water; bring to a gentle simmer. Add
lemon juice and lemon zest. Stir as the mixture simmers for 3
minutes.

2. Mix cornstarch in a small amount of cold water and stir into
strawberries. Stir and cook until mixture thickens, about 1 to 2
minutes. Remove from heat.

3. Divide mixture into 6 dessert dishes and cool in refrigerator.

4. Top each serving with 1 tablespoon whipped topping and serve.

Helpful Hints

* Fresh or frozen strawberries work well in this recipe.
* Adjust the portions to meet your meal plan or carbohydrate goal.


Roopesh Nair


[Read More...]


കരിമീന് പൊള്ളിച്ചത്


 കരിമീന് പൊള്ളിച്ചത്
വിദേശികള് ഏറ്റവുമധികം ഇഷ്ടപ്പെടുന്ന കേരളീയ വിഭവം ഏത്? സംശയം വേണ്ട, കരിമീന് പൊള്ളിച്ചത് തന്നെ. ആലപ്പുഴയിലും കുമരകത്തും കൊല്ലത്തുമൊക്കെ എത്തുന്ന സഞ്ചാരികള്ക്ക് ഏറെ പ്രിയങ്കരമാണ് കരിമീന് പൊള്ളിച്ചത്. വിദേശീയര്ക്കും സ്വദേശീയര്ക്കും ഏറെ പ്രിയങ്കരമായതിനാലാണ് കേരളത്തിന്റെ ഔദ്യോഗിക മല്സ്യമായി കരിമീന് തിരഞ്ഞെടുക്കപ്പെട്ടത്.
കരിമീന് വളര്ത്തലിനും മറ്റുമായി പ്രത്യേക പദ്ധതികളാണ് സംസ്ഥാന സര്ക്കാര് ആവിഷ്ക്കരിച്ചിട്ടുള്ളത്. ഏറെ സ്വാദിഷ്ഠമായ കരിമീന് പൊള്ളിച്ചത് തയ്യാറാക്കുന്നത് എങ്ങനെയെന്ന് നോക്കാം.

ചേരുവകള്-
കരിമീന് - ഒരെണ്ണം(വലുത്)
ഇഞ്ചി - 10 ഗ്രാം
വെളുത്തുള്ളി - 10 ഗ്രാം
ഉള്ളി - 50 ഗ്രാം
കറിവേപ്പില - രണ്ട് ഇതള്
മുളകുപൊടി - അഞ്ചു ഗ്രാം
മഞ്ഞള്പ്പൊടി - മൂന്നു ഗ്രാം
മല്ലിപ്പൊടി - അഞ്ചുഗ്രാം
കുരുമുളക് പൊടി - രണ്ടുഗ്രാം
നാരങ്ങ - ഒരെണ്ണം
ഉപ്പ് - ആവശ്യത്തിന്
വെളിച്ചെണ്ണ - 25 മില്ലി
വാഴയില - ചെറുതായി മുറിച്ചത്

തയ്യാറാക്കുന്ന വിധം
കരിമീന് കഴുകി വൃത്തിയാക്കുക. ഇഞ്ചി, വെളുത്തുള്ളി, ഉള്ളി, മുളകുപൊടി, മഞ്ഞള്പ്പൊടി, മല്ലിപ്പൊടി, കുരുമുളകുപൊടി, ഉപ്പ് എന്നിവ ചേര്ത്ത് അരച്ചെടുക്കുക. മിക്സിയില് അരയ്ക്കുന്നതിനേക്കാള് അരകല്ലില് അരയ്ക്കുകയാണെങ്കില് നന്നായിരിക്കും. അങ്ങനെ അരച്ചെടുക്കുന്നത് കരിമീനില് നന്നായി തേച്ചുപിടിപ്പിക്കുക. അതിനുശേഷം അതില് നാരങ്ങനീര് പിഴിഞ്ഞ് ഒഴിക്കുക. തുടര്ന്ന് അരപ്പ് പുരട്ടിയ കരിമീനിന് പുറത്ത് കറിവേപ്പില വിതറുകയും വാഴയിലയില് നന്നായി പൊതിയുകയും ചെയ്യുക. ഇത്തരത്തില് വാഴയിലയില് പൊതിഞ്ഞ കരിമീന് വെളിച്ചെണ്ണ ഒഴിച്ച് ചൂടായിരിക്കുന്ന ചട്ടിയില് തിരിച്ചും മറിച്ചുമിട്ട് വേവിക്കുക. പത്തു മിനിട്ട് വേവിച്ച ശേഷം വാഴയില മാറ്റി ഉപയോഗിക്കുക. അവശേഷിക്കുന്ന നാരങ്ങാനീര് പിഴിഞ്ഞ് ഒഴിച്ച ശേഷം സലാഡ് ചേര്ത്ത് കഴിക്കുക.
[Read More...]


അവൽ ഇഡ്ഡലി...


അവൽ ഇഡ്ഡലി...


എന്റടുക്കളയിൽ ഏറ്റോം ഏളുപ്പത്തിൽ എടുക്കാവുന്ന പരുവത്തിൽ വച്ചിരിക്കുന്ന രണ്ട് പാട്ടകളുണ്ട്. ഒന്ന് ഓട്സിന്റേം പിന്നൊന്ന് അവലിന്റേം. എന്തുണ്ടാക്കണമെന്ന് ഒരു തരി പോലും ഐഡിയ ഇല്ലാതെ നിൽക്കുകയാണെങ്കിൽ ഇതിൽ രണ്ടിലും ഏതെങ്കിലും ഒന്നിൽ നിന്ന് ഒരു പിടി വാരി ബൌളിലേക്കിടും. പിന്നെ അതിന്റെ മോളിലേക്കൊരു താജ്മഹൽ പണിയാനും മാത്രം ഐഡിയകൾ ഓടോമാറ്റിക്കായി വന്നോളും‌ന്നുറപ്പ്. അങ്ങനുണ്ടായ ഒരു കൊച്ചു താജ്‌മഹലാണ് ഇന്നത്തെ പം‌ക്തിയിൽ.അവൽ ഒരു പിടി വാരി ബൌളിലെക്കിട്ടു. ഒരു കുഞ്ഞു സവാളയും പച്ചമുളകും ഇത്തിരി ഇഞ്ചിയും കുനുകുനാ അരിഞ്ഞ്  ചേർ‌ത്തു. കൂടെ രണ്ടു സ്പൂൺ റവയും. എന്നിട്ട് ഇത്തിരി വെള്ളവും ഉപ്പും ചേർത്ത് നന്നായി ഇളക്കി മിക്സ് ചെയ്തു. അവൽ നന്നായി കുഴഞ്ഞോളും. അപ്പോ അതിൽ എന്തേലുമൊക്കെ പച്ചക്കറികൾ വെട്ടിയരിഞ്ഞിടാൻ തോന്നി. ഫ്രിഡ്‌ജിൽ തപ്പീപ്പോ നോ രക്ഷ. ഒറ്റ പച്ചക്കറി പോലുമില്ല. (നമ്മളെന്തേലും വാങ്ങിച്ചു വച്ചാലല്ലേ ഫ്രിഡ്ജ് തുറക്കുമ്പോ വല്ലോം കിട്ടൂ, അല്ലാണ്ട്  അതിന്റകത്ത് സ്വന്തമായി കൃഷിയൊന്നുമില്ലല്ലോ :-( ) . ഹ്ം അതെന്തേലുമാവട്ടെ. ഒന്നൂടെ ആഞ്ഞു തപ്പീപ്പോ ഇന്നലത്തെ പച്ചപ്പയർ മെഴുക്കുപെരട്ടീടെ ബാക്കി കുറച്ചിരിക്കുന്നു. പിന്നെന്ത് നോക്കാൻ. അതും കൂടി എടുത്ത് മോളിൽത്തെ കൂട്ടിലേക്കിട്ട് ഇളക്കി യോജിപ്പിച്ചു. എന്നിട്ട് ഒരു കുഞ്ഞു മൈക്രോവേവ് ബൌളിൽ കുത്തിനിറച്ച് 5 മിനിട്ടു നേരം ഫുൾ പവറിൽ വച്ചെടുത്തു. അതിനെ എടുത്ത് ഒരു പ്ലേറ്റിലെക്ക് മറിച്ചിട്ടപ്പം അതാ ഒരു അവൽ ഇഡ്ഡലി പുഞ്ചിരി തൂകിക്കൊണ്ടു ജിൽ ജില്ലെന്ന് നിൽ‌ക്കുന്നു!!!
(Source)
[Read More...]


ചോളം ഉപ്പുമാവ്...


ചോളം ഉപ്പുമാവ്...


ഒന്നൂല്ല. ഫ്രിഡ്ജിൽ എപ്പഴേലും മേടിച്ച ചോളം കൊണ്ടു തള്ളിയിട്ടുണ്ടോ എന്നു നോക്കുക. ഉണ്ടെങ്കിൽ അതിന്റെ അല്ലികളടർ‌ത്തി എടുക്കണം (ഒരു ജാഡയ്ക്ക് പറഞ്ഞൂന്നെയുള്ളൂ, ഞാൻ കത്തീം കൊണ്ട് ഇങ്ങ് ചെത്തിയെടുക്കുകയാ ചെയ്തത്, അത്രേമൊക്കെ മെനക്കെടാനേ പറ്റൂ) . ന്നിട്ട് ഒരു സ്പൂൺ എണ്ണയിൽ കടുകു പൊട്ടിച്ച്, സവാളയും പച്ചമുളകും കുഞ്ഞു കുഞ്ഞായി അരിഞ്ഞതും ഇഞ്ചീം വെളുത്തുള്ളീം ചതച്ചതും നന്നായി വഴറ്റി അതിലേക്ക് ഒരു തക്കാളി കുനുകുനാ അരിഞ്ഞതും കൂടി ഇട്ടേക്ക്. ഇനി ചോളമെടുത്ത് ഇതിലെക്കിട്ട് കുറച്ച് ഉപ്പുമിട്ട് നികക്കെ വെള്ളവുമൊഴിച്ച് ചോളം നല്ല സോഫ്റ്റാവുന്നതു വരെ മൂടി വച്ച് വേവിക്കണം. ചുമ്മാതിരുന്ന് ചോളത്തിനു ബോറടിക്കാതിരിക്കാൻ ഇടയ്ക്കിടെ ഒന്നിളക്കിക്കൊടുത്താലും കുഴപ്പമില്ല. അത്മാർ‌ത്ഥത കൂടിപ്പോയി ചോളം വെന്തവിഞ്ഞ് അതിന്റെ അസ്തിത്വം നഷ്ടപ്പെട്ടു പോവരുത്. വെള്ളമൊക്കെ വറ്റി കഴിയുമ്പൊൾ എടുത്ത് കുറച്ച് പൊമഗ്രനേറ്റ് അല്ലികളും ചേർ‌ത്തിളക്കി (ഇതു ചോളത്തിന്റെ കൂടെ നല്ല കോമ്പിനേഷൻ ആണ്, ലുക്കിലും ടേസ്റ്റിലും അവനവന്റെ കലാബോധമനുസരിച്ച് അങ്ങു വിളമ്പിയേക്ക്. അത്രേയുള്ളൂ സംഭവം. 
(Source)
[Read More...]


Mutton Biriyani


Mutton Biriyani

Ingredients


Mutton, 1 1/2 inch pieces  1 kilogram
Basmati rice  1 1/2 cups
Ginger  4 inch piece
Saffron (kesar)  7-8 strands
Milk , warm  1/2 cup
Yogurt  2 cups
Salt  to taste
Turmeric powder  1 teaspoon
Garlic paste  1 1/2 tablespoons
Oil  to deep fry
Onions, thinly sliced  4-5 large
Cloves  4-5
Cinnamon  1 inch stick
Green cardamoms  4-5
Black cardamoms  1-2
Peppercorns  6-8
Ghee  5 tablespoons
Green chillies, chopped  2
Coriander powder  2 tablespoons
Cumin powder  1 tablespoon
Red chilli powder  1 teaspoon
Tomatoes, chopped  4 large
Garam masala powder  2 teaspoons
Fresh coriander leaves, coarsely chopped  1/2 bunch
Fresh mint leaves, coarsely chopped  1/2 bunch
Butter  3 tablespoons

Method


Soak rice for half an hour in five to six cups of water. Drain and keep aside. Cut half the
ginger into julienne and make a paste of the rest. Soak saffron in warm milk and keep aside.

Marinate mutton in yogurt, salt, turmeric powder and one tablespoon each of ginger and garlic pastes. Marinate for about four hours in a refrigerator. Heat sufficient oil in a kadai and fry half of the sliced onions till brown and crisp. Drain and keep onto an absorbent paper.
Cook rice in salted five cups of boiling water along with cloves, cinnamon,

green and black cardamoms and peppercorns till rice is almost cooked. Strain and keep rice warm. Heat ghee in a thick-bottomed pan or pressure cooker. Add remaining sliced onions and green chillies. Cook, stirring continuously, till onions are light golden brown. Add
remaining ginger paste and garlic paste and mix well. Add marinated mutton and cook on highheat for seven to eight minutes.

Add coriander powder, cumin powder and red chilli powder. Mix thoroughly. Stir in three cups of water, bring it to a boil, reduce heat and cook
covered till mutton is almost cooked.
Add tomatoes, salt, half the garam masala powder and fresh coriander leaves. Cook for fifteen minutes on medium heat, stirring occasionally.
In case you are cooking the mutton in a pressure cooker, add chopped tomatoes, salt, garam
masala powder, two cups of water and chopped fresh coriander leaves after adding dry spices.
Pressure cook till mutton is almost cooked. It normally takes two to three whistles to cook. Ensure that the cooked mutton does not have a thin gravy. If that is the case cook on high heat to reduce. Preheat oven to 180C. Arrange half the quantity of cooked mutton in an ovenproof dish and spread half the quantity of cooked rice on top of the mutton.
Sprinkle a little of the remaining garam masala powder, half each of ginger julienne, saffron dissolved in warm milk and mint leaves. Dot the rice with half the quantity of butter.
Spread the remaining mutton on top of the rice, followed by cooked rice and repeat the earlier process with the remaining quantities of ginger julienne, saffron milk, garam masala powder, mint leaves and butter. Cover it with aluminium foil and cook in the preheated oven for fifteen to twenty minutes at 180C. Garnish with fried sliced onions and serve.


 Roopesh Nair
[Read More...]


Pepper Chicken


Pepper Chicken

A very good recipe . Nice with rice or roti . Adjust the pepper and green chillies according to taste.

INGREDIENTS


2 lb chicken pieces
2 tbsp peppercorns coarsely ground
3 large onions sliced long
4 green chillies slit (to taste)
1 1/2 tbsp ginger garlic paste
1 tsp garam masala
1/2 cup tomato puree or sauce
a bunch of coriander leaves chopped
A sprig of curry leaves
juice of half lime
oil for cooking
salt to taste

Method


1. Marinate the chicken pieces with salt , ground pepper , half of the ginger garlic paste and lime juice for 30 minutes to 2 hours.

2. Heat about 2 tbsp oil in a pan .Shallow fry the chicken pieces for about 7 minutes of till lightly browned. Drain to paper towel and keep them warm.

3. Add little bit more oil and add the curry leaves, green chillies and the rest of the ginger garlic paste. Saute for a while and then add the tomato sauce or puree. Bring it to a boil and add the chicken pieces.

4. Add the garam masala and coriander leaves. Stir well .Cover and cook till chicken is tender. Add hot water in between , if required.

5. Meanwhile in another pan , heat some more oil and saute the onions with little bit salt. Saute till the onions are well browned and carmalized. Drain to paper towels.

6. Shutdown the flame when the chicken is cooked and the curry becomes dry. Add the browned onions and stir well. Serve hot garnished with extra chopped coriander leaves .

Roopesh Nair
[Read More...]


Egg Masala


Egg Masala

Ingredients


Eggs - 6 (hard boiled)
Onion - 1 1/2 medium sized (thinly sliced)
Dry red chillies - 5
Cumin seeds - 1 tsp
Urad dal - 1 tsp
Curry Leaves - 1 strand
Salt - as needed
Cilantro - for garnish (finely chopped)
Oil - 1 tblsp

Method


1. For boiling the eggs, bring water to a boil in a saucepan. Add the eggs, cover and let it simmer for 10 minutes. Drain the water and run the eggs under cold water immediately. Peel off the eggs shells.
2. Dry roast the cumin seeds, urad dal, dry red chillies and curry leaves for few minutes.
3. After it cooled, grind it to a coarse powder.
4. Cut the hard boiled eggs into half lengthwise and add the ground powder to the eggs. Mix it gently so that all the eggs get coated with the powder nicely.
5. Heat oil in a pan and saute the onions nicely. The onions have to be golden brown. This might take about 15-20 minutes.
6. Add the egg halves along with the coated powder and any leftover powder to the pan.
7. Reduce the heat, gently toss everything, cover and let it cook for about 5 minutes.
8. Finally add the finely chopped cilantro, mix once again gently and switch off.
9. This egg masala goes very well with chappattis, pulav and white rice.


[Read More...]


Egg Biriyani


Ingredients

Basmati Rice - 3 cups
Eggs - 4 + 3
(4 Hard Boiled eggs + 3 eggs scrambled)
Saffron - a pinch (soaked in 2 tblsp of milk)
Whole Garam Masala - (2" cinnamon stick, 4 cloves, 3 cardomom, 1 Bay Leaf, 1 star anise, 1 bay leaf)Shahi Jeera - 1/2 tsp
Oil - 1 tblspSalt - as needed
Water - about 10 cups
Mint Leaves - handful

For Masala

Onion - 2 medium (chopped)
Tomatoes - 2 (chopped)
Ginger garlic Paste - 1 tblsp
Cilantro (Corriander Leaves) - handful (finely chopped)
Mint Leaves - handful (chopped)
Green Chillies - 3 or 4 (chopped/slit)
Yogurt - 4 tblsp
Lemon Juice - 2 tblsp
Ghee and/or Oil - 2 tblsp
Biriyani Masala - 1.5 tblsp
(You can also substitute with 1 tsp chili powder, 4-5 peppercorns, 1 tsp corriander powder, 1 tsp cumin powder and 1/4 tsp turmeric powder)
Salt - as needed

Preparation

1. Hard boil 4 eggs, peel it and cut it into half lengthwise.

2. Sprinkle a pinch of biriyani masala, little salt and little corn flour on the eggs and shallow fry. Keep it aside.
3. Scramble the remaining 3 eggs with little salt and black pepper powder and keep aside.
4. Cook the rice in plenty of water (about 10 cups) along with 1 tblsp oil, shahi jeera, whole garam masala, salt and some mint leaves. (You can add a pinch of turmeric powder too if you want a bright yellow colour).
5. When the rice is 3/4 th cooked, drain the water and spread it on a tray to cool.
6. Preheat oven to 350 degree F.

For making masala

1. Heat ghee and oil in a pan and add the onions and green chillies. Saute till the onions turns brown.

2. Add the ginger garlic paste and fry for a minute. Add the chopped mint leaves and cilantro.
3. Add the tomatoes and cook till it gets mashed up.
4. Add the yogurt, biriyani masala and salt. Cook this till you get a nice masala and the oil seperates from the masala.
5. Add lemon juice to the masala just before switching off.

Layering the Biriyani

The dum process can be done in a conventional oven or stove top. Take a tray or a big heavy bottomed vessel and do the layering as follows.

1. Grease the bottom of the vessel/tray with some ghee or oil.

2. Spread half of the cooked rice at the bottom. This will be the first layer.

3. Pour the egg masala over the rice as the 2nd layer.

4. Put the scrambled layer over the masala followed by the remaining rice.

5. Top this with the saffron flavoured milk, some ghee, some fried onions, finely chooped cilantro and mint leaves.

6. Arrange the hard boiled eggs on the top.

7. Cover with an aluminium foil and seal all sides so that the steam wont be able to escape.

8. Leave it in a 350 degree oven for half an hour. By this time the aroma of the biriyani will fill the house.
(If you are doing the dum on stove top, reduce the flame to the lowest setting and cook for about 20 mintes.)

9. Gently fluff up and mix the rice before serving. This way the masala and scrambled egg will be evenly distributed in the rice.

Serving suggestion

- Serve this biriyani with some raita and any non veg sidedish.
- This tastes delicious with some pickle and potato chips too.
Serves : 4-5

(Roopesh Nair)

[Read More...]


Pineapple & Banana Pancakes


[Read More...]


സോയാ മഞ്ചൂരിയൻ...


സോയാ മഞ്ചൂരിയൻ...

മഞ്ചൂരിയനോട് പണ്ടു തൊട്ടേ എനിക്കു വല്യ സ്നേഹമാണ്. വഴിസൈഡിലെ കടകളിൽ നിന്ന് ഗോബിമഞ്ചൂരിയൻ വാങ്ങി വെട്ടിവിഴുങ്ങിക്കൊണ്ടിരുന്ന ഒരു കാലവുമുണ്ടായിരുന്നു. അങ്ങനെയിരിക്കെ ടപ്പേന്ന് കാലം മാറി. വിഴുങ്ങുന്ന സാധങ്ങളിലെ ഇൻ‌ഗ്രേഡിയന്റ്സിനെ സം‌ശയദൃഷ്ടിയോടെ വീക്ഷിക്കുന്ന ഒരവസ്ഥയിലേക്ക് ഞാനങ്ങു നന്നായി. അങ്ങനെ സ്കാനിം‌ഗിനു വിധേയമാക്കപ്പെട്ട ഐറ്റങ്ങളിൽ ഒന്നായിരുന്നു മഞ്ചൂരിയനും. മഞ്ചൂരിയനിലെ പ്രധാന വില്ലൻ‌മാരായ ഒന്ന് ഡീപ് ഫ്രൈ ചെയ്യുന്ന എണ്ണ, പിന്നെ ടൊമാറ്റോ സോസിലെ ഷുഗർ കണ്ടന്റ്, അജിനോമോട്ടോ എന്നിവർ എന്നെ നോക്കി പല്ലിളിച്ചു കാണിച്ചു. അതുങ്ങളെ കീഴടക്കാൻ വേണ്ടി ഞാൻ മഞ്ചൂരിയനെ രണ്ടും കല്പിച്ച് ഒന്ന് അഴിച്ചു പണിതു. ദേ ദിങ്ങനെ.

ആദ്യം തന്നെ ഡീപ് ഫ്രൈ സം‌ഭവം അങ്ങ് ഒഴിവാക്കി. പകരം സോയാ ചങ്ക്സ് എടുത്ത് ഇത്തിരി വെള്ളത്തിൽ ഒന്നു കുതിർ‌ത്ത് മൈക്രോവേവിൽ ഒന്നുരണ്ടു മിനിട്ടു വച്ച് ഒന്ന് വേവിച്ചെടുത്തു. ന്നിട്ട് അതിൽ കുറച്ച് ഉപ്പും മുളകുപൊടിയും ചിക്കൻ മസാലയും തിരുമ്മി നോൺ‌സ്റ്റിക്ക് പാനിലിട്ട് നന്നായി വരട്ടിയെടുത്ത് മാറ്റി വച്ചു.

ഇനി വേണ്ടത് ടൊമാറ്റോസോസ് ആണ്. കടേന്ന് മേടിക്കുന്ന സോസെടുത്ത് ‘ശൂ ഷുഗറേ പോ’ എന്നു പറഞ്ഞാലൊന്നും അതിലെ പഞ്ചാര പോവില്ല. അതോണ്ട് ഞാനൊരു ഡ്യൂപ്ലികേറ്റ് സോസങ്ങ് ഉണ്ടാക്കി. ഒരു പഴുത്ത തക്കാളി, പച്ചമുളക്, ഇത്തിരി ശർക്കര, ഇത്തിരി പുളി പിഴിഞ്ഞത് ഇത്രെം നന്നായി അരച്ചെടുത്തു അതിനെ ടൊമാറ്റോ സോസെന്ന് മൂന്നുവട്ടം പേരുചൊല്ലി വിളിച്ചു.

അജിനോമോട്ടോ- അതിനോടു പോയി പണി നോക്കാൻ പറഞ്ഞു. അതില്ലാതെ മഞ്ചൂരിയൻ ഉണ്ടാക്കിയാലുംആകാശമൊന്നും ഇടിഞ്ഞു വീഴില്ല.

അപ്പോ ഇങ്രേഡിയന്റ്സ് ഒക്കെ ആയി. ഇനി ഒരു സവാള എടുത്ത് ഇത്തിരി വീതിയിൽ അരിഞ്ഞ് ഒരു സ്പൂൺ എണ്ണയിൽ വഴറ്റുക. അതിലേക്ക് വെളുത്തുള്ളി-ഇഞ്ചി പേസ്റ്റിട്ട് പച്ചമണം മാറുമ്പോൾ നമ്മടെ ആ ടൊമാറ്റോസോസ് ഒഴിച്ച് നന്നായി കുളുകുളാന്ന് വേവിക്കുക. എരിവ് വേണമെങ്കിൽ ഇത്തിരി മുളകുപൊടീം കൂടെ ഇട്ടോ. ഇതിലേക്ക് നേരത്തെ റെഡിയാക്കിയ സോയാചങ്ക്സും ഇട്ട് ശകലം സോയാ സോസുംഒഴിച്ച് (ഇത് അങ്ങു കോരിയൊഴിച്ചെക്കരുത്. അത്ര നല്ല സാധനമൊന്നുമില്ല) പിന്നെ ഉപ്പു നോക്കി വേണമെങ്കിൽ ഉപ്പും ചേർ‌ക്കണം. സോയാസോസിൽ തന്നെ നല്ലോണം ഉപ്പുണ്ട്. അതു മനസിൽ വച്ചോണം . എന്നിട്ട് കുറച്ചു നേരം അടച്ചു വച്ച്  നന്നായി ഇളക്കി ഇങ്ങെടുക്ക്. സ്പ്രിം‌ഗ് ഒനിയനും കാപ്സിക്കവും ഒക്കെയുണ്ടെങ്കിൽ അതു കൂടി ചേർ‌ത്തോ. എന്റടുക്കളയിൽ അതൊന്നും ഇല്ലായിരുന്നു. പിന്നില്ലേ ടൊമാറ്റോ സോസിനു നല്ലോണം കൊഴുപ്പുള്ളതു കൊണ്ട് സാധാരണ ചേർക്കുന്നതു പോലെ കോൺ-പൊടിയൊന്നും ചേർ‌ക്കണ്ട ആവശ്യമില്ല കേട്ടോ.

ഇതിപ്പോ ഞാൻ ബാറ്ററിലൊന്നും മുക്കിപ്പൊരിക്കാതെ  നേരെ അങ്ങുണ്ടാക്കുകയാണു ചെയ്തത്. ഇനി അതു വേണേ തന്നെ കട്ടിക്ക് മാവു കലക്കീട്ട് മൈക്രോവേവിൽ വച്ചെടുത്താൽ മതിയാരിക്കും. ഞാൻ പരീക്ഷിച്ചു നോക്കീട്ടില്ല.അതോണ്ട് ആരേലും അതു പരീക്ഷിച്ച് പരാജയപ്പെട്ട് എന്നെ തല്ലാൻ വന്നാൽ അമ്മച്ച്യാണേ ഞാൻ തിരിച്ചു തല്ലും.പറഞ്ഞില്ലാന്നു വേണ്ട...

(Source)
[Read More...]


മലബാര്‍ ചിക്കന്‍


മലബാറിന്റെ ചിക്കന്‍ പരിമളം
 
കേരളത്തിന്റെ രുചി വൈവിധ്യം തേടിയുള്ള ഒരു യാത്ര. ജയ്‌ഹിന്ദ്‌ ടി.വി.യില്‍ സ്വാദ്‌ എന്ന പരിപാടിയിലൂടെ ശ്രദ്ധേയനായ വിജയ്‌ അശോകിന്റെ രുചിയാത്രയുടെ അക്ഷര തുടര്‍ച്ച. നാടന്‍, നാടോടി രുചിമുകുളങ്ങളിലൂടെയുള്ള ഒരു അനുയാത്ര; ഒപ്പം ആ രുചിക്കൂട്ടുകളും.


സൂരി നെന്മാറയുടെ, സുരേന്ദ്രന്‍ ചേട്ടന്റെ വീട്ടില്‍ .... ഇവിടെ സുരേന്ദ്രന്റെ ഭാര്യ ഗീതയും അമ്മ ഗൗരിയും. നില്‍ക്കാന്‍ സമയമില്ല... വയറില്‍ വിശപ്പ്‌ കത്തിത്തുടങ്ങിക്കഴിഞ്ഞിരിക്കുന്നു.... നല്ലൊരു പാചകക്കാരനായ സൂരി ചേട്ടനാണ്‌ പാചകത്തിനായി രംഗത്തെത്തിയിരിക്കുന്നത്‌. സ്വന്തമായൊരു കാറ്ററിംഗ്‌ യൂണിറ്റുള്ള സൂരിയുടെ കൈയൊപ്പു പതിഞ്ഞ ഇന്നത്തെ 'മലബാര്‍ ചിക്കന്‍'.. ആകട്ടെ ഇക്കുറി.


ചേരുവകളെല്ലാം തയാര്‍..

ഇടത്തരം വലിപ്പത്തില്‍ കഷണങ്ങളാക്കി കഴുകിയെടുത്ത ഒന്നരക്കിലോ ചിക്കന്‍, നാലു വലിയ സവാള നീളത്തില്‍ പൊടിപൊടിയായി അരിഞ്ഞത്‌, രണ്ടു പച്ചമുളക്‌, 25 ഗ്രാം ഇഞ്ചി, 25 ഗ്രാം വെളുത്തുള്ളി, പഞ്ചസാര, തൈര്‌, പെരുംജീരകം, ഗ്രാമ്പൂ, പട്ട, ഏലയ്‌ക്ക നാലെണ്ണം, 25 ഗ്രാം ചെറിയ ഉള്ളി, മുളകുപൊടി, മല്ലിപ്പൊടി, ഉപ്പ്‌, മഞ്ഞള്‍പ്പൊടി, വെളിച്ചെണ്ണ, കറിവേപ്പില, രമ്പ ഇല....

ചീനച്ചട്ടി അടുപ്പില്‍ വയ്‌ക്കുകയാണ്‌ സൂരിച്ചേട്ടന്‍. ചട്ടി ചൂടായശേഷം മാത്രമേ ചേരുവകള്‍ ചട്ടിയില്‍ ഇടാവൂ എന്ന്‌ സൂരിച്ചേട്ടന്‍ പറഞ്ഞത്‌ ആദ്യം മനസിലായില്ല.

ചേരുവകള്‍ ചട്ടിയുടെ അടിയില്‍ പിടിക്കാതിരിക്കാനുള്ള എളുപ്പമാര്‍ഗമാണിത്‌... ചട്ടി ചൂടായിക്കഴിഞ്ഞു... ഇനി എണ്ണ: എണ്ണ ചൂടാകുമ്പോള്‍ നാലുകഷണം കറുവപ്പട്ട, അഞ്ച്‌ ഏലയ്‌ക്ക, പെരുംജീരകം ഒരു ടേബിള്‍സ്‌പൂണ്‍, അഞ്ച്‌ ഗ്രാമ്പൂ എന്നിവ ഇടുക.

ഇനി ചെറിയ ഉള്ളി, ഇഞ്ചി, പച്ചമുളക്‌, വെളുത്തുള്ളി എന്നിവ മിക്‌സിയിലിട്ട്‌ ചെറുതായി ചതച്ച്‌ ചീനച്ചട്ടിയിലെ മിശ്രിതത്തിലേക്ക്‌ ചേര്‍ക്കണം. ഇവയെല്ലാം മൂക്കുമ്പോള്‍ അരിഞ്ഞുവച്ച സവാളയും ചട്ടിയിലേക്കിടും... സവാള വഴറ്റുമ്പോള്‍ അല്‌പം ഉപ്പുകൂടി ചേര്‍ക്കുകയാണെങ്കില്‍ നന്നായിരിക്കും എന്ന്‌ സൂരിച്ചേട്ടന്‍... ശരി.. ഉപ്പും ചേര്‍ത്തു... സവാള മൂപ്പായി..

ഇനിയാണ്‌ രംബ ഇലയുടെ റോള്‍. രംബ ഇലയെടുത്ത്‌ കുരു കടുംകെട്ട്‌ കെട്ടി ചട്ടിയിലേക്കിടും. കാരണം പാചകം കഴിയുമ്പോള്‍ ഇതെടുത്ത്‌ കളയുന്നതാണ്‌. ഈ ഇലയിട്ട്‌ ഒന്നു തിളച്ചുവരുമ്പോള്‍... എന്താ മണം...!

ഇനി അല്‌പം പഞ്ചസാര ആകാം... അതെ, പഞ്ചസാരതന്നെ...! പഞ്ചസാര ഇടുമ്പോള്‍ ഇറച്ചി മൃദൃവാകും ഉടഞ്ഞുപോകുകയുമില്ല.. സൂരിച്ചേട്ടന്റെ സ്‌പെഷ്യല്‍ ടിപ്‌സ്. ഇനി അല്‍പ്പം തൈരാണ്‌ ചേര്‍ക്കേണ്ടത്‌. ഇതും ഇറച്ചി സോഫ്‌ട് ആക്കാന്‍ തന്നെ. ഇത്രയും ചൂടാക്കിയതിനു ശേഷം ചിക്കന്‍കൂടി ചേര്‍ക്കുക... ഇളക്കാന്‍ മറക്കല്ലേ... അല്‌പം മഞ്ഞള്‍പ്പൊടി ചേര്‍ത്തോളൂ... വെള്ളം വേണ്ട... കാരണം ബ്രോയിലര്‍ ചിക്കനില്‍ അല്‌പം വെള്ളം ഉണ്ടാകും. ഇനി അടച്ചുവച്ചോളൂ.. ഒരു കാര്യം മറക്കരുത്‌... പകുതി വേവാകുമ്പോള്‍ രംബ ഇല എടുത്ത്‌ കളയണം... ഇനി ചെയ്യേണ്ടത്‌ നാല്‌ വലിയ സ്‌പൂണ്‍ കാശ്‌മീരി മുളകുപൊടി, മല്ലിപ്പൊടി എന്നിവയും കൂടി ചട്ടിയില്‍ ചേര്‍ക്കുകയാണ്‌.

ഒന്നിളക്കി പാകത്തിന്‌ ഉപ്പും ഇട്ടോളൂ... വീണ്ടും ചട്ടി പത്തുമിനിട്ട്‌ അടച്ചുവയ്‌ക്കണം. മൂന്നുമിനിട്ട്‌ നല്ല തീയിലും ഏഴുമിനിറ്റ്‌ ചെറുതീയിലും വേവിക്കുക... ഇതാ ചിക്കന്‍ മലബാറി റെഡി... ഇനിയൊരു മാജിക്കാണ്‌... ഈ ചിക്കന്‍ മലബാറിയെ സൂരിച്ചേട്ടന്‍ ചിക്കന്‍ നെന്മാറയാക്കുന്ന അത്ഭുതവിശേഷം... ചിക്കന്‍ മലബാറിയില്‍ കറിവേപ്പില, മല്ലിയില ഒന്നും ഉപയോഗിക്കാറില്ല.. അല്‌പം കറിവേപ്പില എടുത്ത്‌ കൈക്കുള്ളില്‍വച്ച്‌ കശക്കി കറിയിലേക്ക്‌ ഇടുകയാണ്‌... കുറച്ച്‌ പച്ചവെളിച്ചെണ്ണകൂടി ഒഴിച്ച്‌ ചിക്കന്‍പാത്രം നന്നായടയ്‌ക്കുക. വിളമ്പാന്‍നേരത്തേ ഇനിയതു തുറക്കാവൂ... ക്ഷമിച്ചിരിക്കാന്‍ വയ്യ... കഴിച്ചിട്ടേയുള്ളൂ ബാക്കി...

(Mangalam)

[Read More...]


ഓട്സ്-പപ്പായ സ്മൂതി...


ഓട്സ്-പപ്പായ സ്മൂതി...


രാവിലെ പകുതി ഉറക്കത്തിൽ അടുക്കളയിൽ കേറുന്നവർക്ക് യാതൊരപകടവുമില്ലാതെ ഉണ്ടാക്കാൻ പറ്റുന്ന സാധനം. കരിയുക,പുകയുക,പൊട്ടിത്തെറിക്കുക തുടങ്ങിയ ഒരപകടവുമില്ല. എന്താ ചെയ്യെണ്ടതെന്നു വച്ചാൽ, ഒരു പിടി ഓട്സെടുത്ത് അതു മുങ്ങുന്നത്ര വെള്ളത്തിൽ മുക്കി മൈക്രോവേവിൽ ഒരു മിനിട്ട് വച്ച് ഇത്തിരി വേവിക്കുക. എന്നിട്ട് അതിനെ എടുത്ത് മിക്സീലിട്ട് കൂടെ കുറച്ചു പഴുത്ത പപ്പായ (ഞാൻ ഒരു മീഡിയം സൈസ് പപ്പായയുടെ കാൽ‌ഭാഗമാണ് എടുത്തത്) കഷ്ണിച്ച് അതിലേക്കിടുക. ഒരു ചെറുപഴോം നുറുകി അതിലെക്കിടണം. പിന്നെ ഇത്തിരി എലയ്ക്ക,കറുവാപ്പട്ട പൊടിച്ചതും. ഇനി കുറച്ച് തേനും കൂടി ഒഴിച്ചോ. എന്നിട്ട് നന്നായി മിക്സീലടിച്ച് കുഴമ്പു പരുവത്തിലാക്കുക. വല്ലാതെ തിക്ക് ആയിപ്പോയെങ്കിൽ ഇത്തിരി വെള്ളോം ചേർ‌ത്തടിച്ചോ. പരിപാടി കഴിഞ്ഞു. വേണമെങ്കിൽ മിക്സീടെ ജാറിൽ നിന്നു തന്നെ നേരിട്ടങ്ങു കുടിക്കാം. അത്രെം പ്രാകൃതമായി പെരുമാറാത്തവർക്ക് ഗ്ലാസിലൊഴിച്ചും കുടിക്കാം. എന്നെപോലെ ഭീകര കലാബോധമുള്ളവരാണെങ്കിൽ പപ്പായ കുഞ്ഞുകുഞ്ഞായി അരിഞ്ഞ് അതിന്റെ മോളിൽ വിതറി അലങ്കരിക്കുകയും ചെയ്യാം.

പ്രത്യേകം ശ്രദ്ധിക്കേണ്ട ചില കാര്യങ്ങൾ:
1)പപ്പായയുടെ തൊലി കളയാൻ പ്രത്യേകം ശ്രദ്ധിക്കുക. ഇല്ലെങ്കിൽ അന്തരാത്മാവു വരെ കയ്ക്കും
2)പഴത്തിന്റെ തൊലീം കളയണം. ഇല്ലെങ്കിൽ മിക്സി കറങ്ങുന്ന വഴിക്ക് പഴത്തൊലിയിൽ ചവിട്ടി തെന്നിവീഴാനുള്ള സാധ്യതയുണ്ട്.
3)ഇതിനു പപ്പായ തന്നെ വേണമെന്നില്ല. ഇത്തിരി പ്ലും പ്ലും‌ന്നുള്ള ഏതു പഴങ്ങളും ആവാം

(Source)
[Read More...]


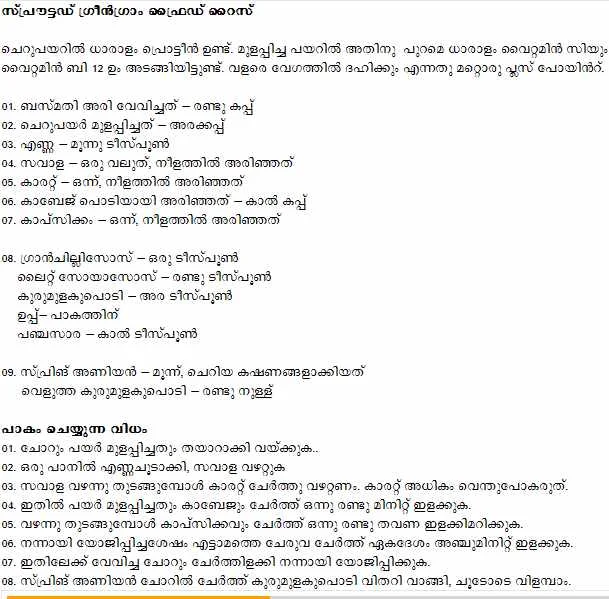
Sprouted Green Gram Fried Rice


Sprouted Green Gram Fried Rice


Green grams are rich in proteins. Sprouted green grams contain, in addition, plenty of vitamin C and vitamin B12. Another advantage is that they are quickly digested.


Ingredients 
01. Basmati Rice (cooked) - 2 cups
02. Sprouted green gram - ½ cup
03. Oil - 3 tsp
04. Onions (large, sliced thin) - 1
05. Carrot (sliced thin) - 1
06. Cabbage (grated) - ¼ cup
07. Capsicum (sliced) - 1
08. Chilli sauce - 1 tsp
09. Light soya sauce - 2 tsp
10. Pepper powder - 1 tsp
11. Salt - to taste
12. Sugar- ¼ tsp
13. Spring onions (chopped fine) - 3
14. White pepper powder -  2 pinch

Preparation 
01. Sprout the green grams and keep it ready.
02. Heat oil in a pan and saute the onions.

03. When the onions are well sauteed, add the carrots and saute again. Take care to see that the carrots are not overcooked.

04. Now add the sprouted green grams and the cabbage and stir for a minute or two.
05. Add the capsicum and mix thoroughly once or twice.

06. When it is well blended, add the chilli sauce, light soya sauce, pepper powder, salt and sugar and saute for  5 minutes.

07. Now add the cooked rice and blend it well.
08. Garnish with the spring onions, sprinkle pepper powder and remove from the flame. Serve hot.
(Source: Manorama)
[Read More...]


മട്ടണ്‍ മുഗളായ് / സ്പ്രിംഗ് ചിക്കന്‍ / Ginka Dharkkary(prawns)


 മട്ടണ്‍ മുഗളായ് / സ്പ്രിംഗ് ചിക്കന്‍


[Read More...]


ഹമ്മൂസ് - Hamoose


ഹമ്മൂസ്


കടപ്പാട്: മനോരമ 
[Read More...]


നാടന്‍ മട്ടന്‍കറി


നാടന്‍ മട്ടന്‍കറി

Courtesy: Manorama Daily


[Read More...]


ഓട്സ് അപ്പം...


ഓട്സ് അപ്പം...


"Laziness is the mother of easy Recipes"
ഈ ഒരു വിഭവത്തെ പറ്റി അത്രെമെ പറയാനുള്ളൂ. വിശപ്പും കുഴിമടീം ഏതാണ്ട് ഒരേ ലെവലിൽ ഹൈ ആയി നിന്നപ്പോൾ  ഉണ്ടായതാണിദ്ദേഹം. പക്ഷെ പറയാതെ നിവർത്തിയില്ല. എനിക്കിതിന്റെ ടേസ്റ്റും ടെക്സ്ചറും ഒരുപാടൊരുപാട് ഇഷ്ടപ്പെട്ടു (എനിക്കു മാത്രമല്ല, എന്റെ ഗിനിപിഗ്‌സിനും‌) ഉണ്ടാക്കാനാണെങ്കിലോ ഭീകര ഈസിയും.ദാ ദിങ്ങനെ:


ഒരു പിടി ഓട്സ് എടുത്ത് ബൌളിലെക്കിടണം. കൂടെ കുറച്ച് ശർക്കര പൊടിച്ചതും. അതിലേക്ക് ഇത്തിരി ചെറുചൂടുള്ള പാലും ഒരു മുട്ടേടേ വെള്ളേം ഇട്ട് ഓം‌ലെറ്റു പരുവത്തിൽ അടിച്ചു യോജിപ്പിക്കുക. ഓട്സ് ഒരുപാടു കുഴഞ്ഞു പോവണ്ട.  വേണമെങ്കിൽ കുറച്ചു തേങ്ങയോ എള്ളോ ജീരകമോ ഫ്ലാക്സീഡ്സോ ഒക്കെ ഇടാം ഒരു സ്റ്റൈലിന്. എന്നിട്ട് ആ കൂട്ടിനെ ദോശക്കല്ലിലെക്കു പരത്തി  (അധികം തിൻ ആക്കണ്ട, ഇത്തിരി കട്ടിക്കിരുന്നോട്ടെ) ചുട്ടെടുക്കുക. ചൂടോടെ തന്നെ കഴിക്കുക. അത്രെയുള്ളൂ.
(Source)
[Read More...]


Cheese Biscuits


Cheese Biscuits
Fun & Info @ Keralites.net
These cheese biscuits from Garrett are the best, enjoy! ~Elise
There are a three secrets to making successful biscuits.
1. You have to be willing to get your hands dirty. Mixing with a spoon overworks the dough. Your hands keep things delicate. Plus, all that squishing and making a mess is fun. (Or put the kids to work. They'll love it.)
2. Keep your butter cold. This ensures plenty of rise, rich flavor, and delicate layers of puffy biscuit.
3. Add lots of cheese. I mean LOTS. Because cheese is good.
Follow these steps and I promise you perfect biscuits every time.
These biscuits only take about five minutes of active work and 12-16 minutes to bake. This means you can whip these babies up in no time flat for picnics, last minute guests, or dinner parties.
The cut up biscuit dough can be frozen in an airtight container and stored for a few months. This means that if you want to double or triple the recipe and save some aside for quick baking later you can. Just plop them on a tray, sling 'em into the oven, and sit back.

Cheese Biscuits Recipe

Prep time: 10 minutes
  • Cook time: 15 minutes
I prefer Parmesan and plenty of black pepper for these, but feel free to substitute cheddar, feta, or your favorite blue cheese. Instead of scallions you can use chives or olives. This recipe is merely a guideline to making perfect cheese biscuits.

Ingredients

  • 2 cups + 2 tablespoons all-purpose flour
  • dash cayenne
  • 1/4 teaspoon salt
  • 1/2 teaspoon black pepper
  • 2 teaspoons baking powder
  • 7 tablespoons butter, cold
  • 2 scallions, finely chopped
  • 3 oz. grated Parmesan cheese
  • 3/4 cup buttermilk
  • Kosher, Maldon, or Black salt for topping (optional; not table/iodized salt)

Method

1 Preheat the oven to 425F. In a large bowl whisk together the flour, cayenne, black pepper, baking powder, and salt. Set aside.
2 Dice the butter into small pieces. If they get too warm then place them in a bowl and put it in the freezer for about 10 minutes before continuing. Toss the diced butter with the flour mixture until well coated. (Again, if into tossing the butter gets hot in your hands place the whole mixture in the freezer for a few minutes.) Add the scallions and cheese and toss until well coated.
3 Add the buttermilk and mix with your hands until it just comes together. You may find you need an extra dribble of buttermilk, is so then go right ahead but do so judiciously. Do not over-knead.
4 Roll the dough out onto a lightly floured surface. Knead once or twice; no more. Form into an 8x8-inch square and cut into 2x2-inch squares and top with a bit of high-quality salt if using. Bake for 12-16 minutes or until golden.
Yield: 16 biscuits


[Read More...]


ഫിഷ്‌ കബാബ് / Fish Kabab


 ഫിഷ്‌ കബാബ്


കടപ്പാട് കൌമുദി വരിക
[Read More...]


കോഴിക്കോടെ പാരഗന്‍ ബിരിയാണി


കോഴിക്കോടെ പാരഗന്‍ ബിരിയാണി


[Read More...]


പുഡിംഗ്


പുഡിംഗ്

[Read More...]


രാജ് കലേഷ്‌ സ്പെഷ്യല്‍


രാജ് കലേഷ്‌ സ്പെഷ്യല്‍

[Read More...]


പരിപ്പിഡ്ഡലീം ഇഞ്ചിച്ചമ്മന്തീം...


വീട്ടിൽ അവയ്‌ലബിൾ ആയ പരിപുകളെല്ലാമെടുത്ത് കുതിർ‌ത്തു വെയ്ക്കണം. ഞാൻ ദാ മിടുക്കിയായി തലേ ദിവസം തന്നെ കടലപ്പരിപ്പ്,തുവരപ്പരിപ്പ്,ചെറുപയർ പരിപ്പ്,ഉഴുന്നുപരിപ്പ് എല്ലാം ശകലം ശകലം എടുത്ത് വെള്ളത്തിൽ മുക്കിവച്ചാരുന്നു. എന്നിട്ട് ആ പരിപ്പുകളെല്ലാം കൂടെ ഇത്തിരി വെള്ളമൊഴിച്ച് നന്നായി അരച്ചെടുക്കണം. ആ മിക്സിലേക്ക് ഇത്തിരി റവയും ഉപ്പും സവാള, പച്ചമുളക്,കറിവേപ്പില ഐറ്റം‌സ് കുഞ്ഞുകുഞ്ഞായി അരിഞ്ഞതും ചേർ‌ത്ത് ഇഡ്ഡലിപ്പരുവത്തിൽ മിക്സ് ചെയ്യണം. പിന്നെന്താ. ഇഡ്ഡലിത്തട്റ്റിൽ ഒഴിച്ച് സ്റ്റീം ചെയ്യാൻ വെയ്ക്ക്. പിന്നെ അതിനെ മൈൻ‌ഡ് ആക്കണ്ട. അതവിടിരുന്നു വെന്തോളും.

അതു വെന്തു വരുമ്പോഴേക്കും ഇഞ്ചിചട്നിയെ ശരിപ്പെടുത്താം.

ഇത്തിരി എണ്ണയൊഴിച്ച് ചൂടാക്കി അതിലേക്ക് കുറച്ച് ഉലുവയും ജീരകവും മല്ലിയും ഉണക്കമുളകും ഇട്ടിളക്കി ഇത്തിരി മുളകുപൊടീം പിന്നെ കുറച്ചധികം ഇഞ്ചീം കുറച്ച് വെളുത്തുള്ളീം അരിഞ്ഞ് പച്ചമണം മാറുന്നതു വരെ ചീനച്ചട്ടിയിൽ ഇട്ട് ഒന്നു ചൂടാക്കണം. എന്നിട്ട് ഇതിനെ എടുത്ത് മിക്സീടെ ചോട്ടാജാറിൽ നിക്ഷേപിച്ച് അതിലേക്ക് കുറച്ച് ശർക്ക്കരയും ഉപ്പും പുളിപിഴിഞ്ഞ വെള്ളവും ഒഴിച്ച് നന്നായി അരച്ചെടുക്കണം. ദിത്രേയുള്ളൂ കാര്യം.
[Read More...]


ചേമ്പ്-മധുരക്കിഴങ്ങ് പുഡ്ഡിംഗ്


ബിലാത്തീലെ ഫാര്‍മേര്‍സ് മാര്‍‌ക്കറ്റിലൂടെ പഴം‌പച്ചക്കറികളെ വായ്നോക്കി നടക്കുമ്പോഴാണ് ആ കട കണ്ടത്. കണ്ണ് സോക്കറ്റീന്നു തള്ളി പുറത്തെക്കു വന്നു എന്നു പറഞ്ഞാല്‍ മതിയല്ലോ. നമ്മടെ കപ്പ ലോ ലവിടെ കുന്നു കൂട്ടി ഇട്ടിരിക്കുന്നു. പറന്നു ചെന്നാണ് കടെല്‍ കേറീത്. ഒരു ആഫ്രിക്കന്‍ കട. നമ്മടെ കപ്പ അവര്‍‌ടെ കസവ ആണു പോലും. ആയ്ക്കോട്ടെ. അടുത്തു തന്നെ ഒരു കൊട്ടയില്‍ ചേമ്പ്. ടാരോ എന്ന് അവരു വിളിക്കും. പിന്നൊരു കൊട്ടേല്‍ പച്ചവാഴക്ക, കുഞ്ഞുള്ളി. എന്നു വേണ്ട കേരളത്തില്‍ ഒരു പച്ചക്കറികടയില്‍ മാത്രം കാണുമെന്നു പ്രതീക്ഷിക്കുന്ന പല സാധനങ്ങളും അവിടെ കാലിമ്മെ കാല് കേറ്റിവച്ചങ്ങനെ ഇരികുന്നു. ഒരു മാതിരി തായത്തെ വീട്ടിലെ മാധവ്യേച്ചീനെ പാഡിം‌ഗ്ടണ്‍ റെയില്വേസ്റ്റേഷനില്‍ വച്ച് കണ്ട പോലത്തെ അമ്പരപ്പും ആഴ്ചര്യവും കൗതുകവും ഒകെയായിരുന്നു. അതുകഴിഞ്ഞ് ഒരു ടീബ്രേക്കിനിടയിലെപ്പോഴോ ഈ 'കേരള ഇന്‍ ബിലാത്തി' സം‌ഭാഷണത്തിനിടയ്ക്ക് കയറി വന്നു, കൂടെയുള്ളത് നടാഷ. ജപ്പാന്‍‌കാരി. ടാരോയും കസാവയും ഒക്കെ കേട്ടപ്പോള്‍ ആ കുട്ടീടെ ആകെപ്പാടെ ഇത്തിരിപ്പോരം മാത്രമുള്ള കണ്ണുകളും വിടര്‍ന്നു. കപ്പേം ചെമ്പുമൊക്കെ അവരുടേം സ്ഥിരം ഐറ്റം‌സ് ആണത്രേ. ചൈനീസ് ജാപ്പാനീസ് ഹവായ്ന്‍ അടുക്കളകളിലെ സ്വന്തം ആള്‍‌ക്കാര്. പക്ഷെ കക്ഷിക്ക് റെസിപ്പി ഒന്നും വല്യ പിടിയില്ല. ജപ്പാന്‍‌കാരിയാണെനേ ഉള്ളൂ, യൂ.കേ ആയിരുനു സ്ഥിര തട്ടകം. എന്തായാലും ഞാന്‍ നമ്മടെ ചേമ്പ് പുഴുങ്ങീതിന്റെം കുഞ്ഞുള്ളീം കാന്താരീം ഉടച്ച ചമ്മന്തീടേ അതീവരഹസ്യമായ ആ കേരളാ റെസിപ്പി ആ കുട്ടിക്ക് കൈമാറി. പകരം വീട്ടീന്ന് ആരോടെങ്കിലും ചോദിച്ചിട്ട് അവരുടെ വിഭവങ്ങള്‍ടെ റെസിപ്പി എനിക്കും കൊണ്ടെത്തരാമെന്നു പറഞ്ഞിരുന്നതാ. പിന്നെ ഞാനും മറന്നു. ആ കുട്ടീം മറന്നു.


കുറെകാലം കൂട് ചേമ്പിനെ കടയില്‍ കണ്ടപ്പോ നടാഷയെ ഓര്‍മ്മ വന്നു, നടാഷ പറഞ്ഞ ടാരോ-ടപ്യോക പുഡ്ഡിം‌ഗും ഓര്‍മ്മവന്നു. എന്നാ പിന്നെ അതില്‍ തന്നെ അക്രമം അഴിച്ചു വിട്ടെക്കാമെന്ന് ഉറപ്പിച്ച് അങ്കം തുടങ്ങി. അങ്ങനെ ടാരോ-ടപ്യോക പുഡ്ഡിം‌ഗിലെ ടപ്യോകേനേ മധുരക്കിഴങ്ങ് വച്ച് റീപ്ലേസ് ചെയ്ത് അവിടെം ഇവിടെം ഒക്കെ കുറച്ചു മാറ്റി അത്ന്റെ കൊച്ചുത്രേസ്യന്‍ വേര്‍ഷന്‍ ഉദയം കൊണ്ടു.

ദേ ദിങ്ങനെ:

കുറച്ച് ചേമ്പും മധുരക്കിഴങ്ങും എടുത്ത് മൈക്രോവേവില്‍ വേവിക്കാന്‍ വെയ്ക്കുക. രണ്‍റ്റിന്റേം തൊലിയൊക്കെ കളഞ്ഞ് ചേമ്പിനെ സമാന്യം വല്യ കഷ്ണങ്ങളാക്കി മുറിച്ചു വെയ്ക്കുക. വെന്ത മധുരക്കിഴങ്ങിനെ യാതൊരു മയവുമില്ലാത്തെ ഇടിച്ചു പൊടിച്ചു മാഷ് ചെയ്യ്. ന്നിട്ട് അടുപ്പത്ത് ആദ്യം ശര്‍ക്കര ഉരുക്കി, തേങ്ങേടെ രണ്ടാം പാലും മൂന്നാം പാലും ചേര്‍ത്ത് ഈ മധുരക്കിഴങ്ങിനെ അതിലിട്ട് കുറുക്കു പരുവത്തിലാക്കണം. കൂടെ കുറച്ച് റാഗിയും ചേര്‍ത്തോ. നല്ലോണം കുറുകും. എന്നിട്ട് അതിലേക്ക് ചേമ്പ്നിന്‍ കഷ്ണങ്ങളിട്ട് ഇളക്കി, തെങ്ങേടെ ഒന്നാം പാലൊഴിച്ച് ഒന്നു തിള വന്നു കഴിയുമ്പോള്‍ ഓഫാക്കണം. എന്നിട്ടെന്താ.. ഒരു സ്പൂണുമെടുത്ത് അതിലെക്ക് ഒറ്റ ചാട്ടം ചാടിക്കോ. ഹല്ല പിന്നെ.

ഇടയ്ക്കു വല്ലോം കറുമുറ കടിക്കണം എന്നുണ്ടെങ്കില്‍ തെങ്ങാക്കൊത്ത്/കടലപ്പരിപ്പ്.കശുവണ്ട് നെയ്യില്‍ വറുത്തതോ അല്ലെല്‍ നിങ്ങടെ ഭാവനയ്ക്കനുസരിച്ച് എന്തെങ്കിലുമൊക്കെയോ അതിലെക്ക് ചേര്‍ക്കാം
[Read More...]


അവലുംവെള്ളം..


നമ്മടെ കോയിക്കോട് വല്യങ്ങാടി ഭാഗത്ത് ചുമട്ടുകാരുടേം മറ്റും ഒരുകാലത്തെ എനർജി ഡ്രിങ്കായിരുന്നൂത്രേ ഇദ്ദേഹം. ജീവിതഭാരോം ചുമന്നു നടക്കുന്നവർക്കായി അതിനെ ഒന്നു റീ-റിലീസ് ചെയ്യാൻ ഒരു ശ്രമം നടത്തി നോക്കി. എന്തായാലും സംഭവം എനിക്കു പെരുത്തിഷ്ടപ്പെട്ടു. പെട്ടെന്നുണ്ടാക്കാം, അതിനുമ്മാത്രം വി.ഐ.പി ഇങ്രേഡിയന്റ്സൊന്നും വേണ്ട, പെട്ടെന്നു കുടിച്ചു/കഴിച്ചു തീർക്കാം, കുറഞ്ഞസമയം കൊണ്ട് കൂടുതൽ എനർജി കിട്ടും അങ്ങനെയങ്ങനെ..

ദാ. ഇങ്ങനെയാണ് സംഭവം ഉണ്ടാക്കീത്.

ഇത്തിരി പൊരികടലേം കശുവണ്ടീം ബദാമും (ശരിക്കും, കൊറിച്ചോണ്ടു നടക്കുന്ന കപ്പലണ്ടിയാണ് ഇതിനുപയേഗിക്കേണ്ടത്. എന്റേല് അതില്ലായിരുന്നു.) ചെറുതായി ഒന്നു ക്രഷ് ചെയ്യുക. പണ്ടൊകെ മുറുക്കാനിടിയ്ക്കുന്ന ആ ഒരു കുഞ്ഞി സെറ്റപ്പില്ലേ അതാണിതിനു ബെസ്റ്റ്. അമ്മാതിരി മോഡേൺ എക്വിപ്മെന്റ്സ് ഒന്നും ഇല്ലേൽ മിക്സീലിട്ട് ഒന്നു കറക്കിയെടുത്താൽ മതി. അതിലേക്ക് രണ്ടു മൂന്നു രസകദളിപ്പഴവും (ഇതില്ലേൽ ഉള്ള പഴം ഉപയോഗിക്കാം. ) മധുരത്തിനനൌസരിച്ച് ശർക്കരേം പിന്നെ കൂടി ഇട്ട് ചതയ്ക്കുക. അതിലേക്ക് കുറച്ച് അവൽ ഇട്ട് കുറച്ച് വെള്ളവും ഒഴിച്ച് സ്പൂണും കൊണ്ട് നന്നായി അടിച്ചു ചേർക്കുക. ഒരു രസത്തിന് ഞാനിത്തിരി ഹോർ‌ലിക്സും കൂടി ഇട്ടു. അപോ അവൽ മസിലൊക്കെ ഒന്ന് അയച്ച് നന്നായി ഒതുങ്ങി ദ പടത്തിൽ കാണുന്ന കോലത്തിലാവും. ഇനി അതങ്ങ് വലിച്ചു കുടിച്ചിട്ട് അല്ലെൽ കോരിത്തിന്നിട്ട് ചുണ്ടു തുടച്ചങ്ങു പ്രഖ്യാപിക്കുക.

“അവലുംവെള്ളം ഈസ് ദ സീക്രട്ട് ഓഫ് മൈ എനർജി” എന്ന്

(വെള്ളത്തിന്‌ പകരം കുറച്ചു പാല്‍ ഒഴിച്ചാല്‍ സംഗതി കലക്കും....കോഴിക്കോട് ഒരുവിധം എല്ലാ കടയിലും കിട്ടുന്ന ഐറ്റം ആണ് ഇത് ..."അവില്‍ മില്‍ക്ക് " ...)
(Source)
[Read More...]


ഫ്യൂഷൻ മുദ്ദെ + തക്കാളി ചട്നി


കർണാടകേൽ കയറിപ്പറ്റി പച്ചരിക്കു കാശുണ്ടാക്കുന്നവർക്കു നല്ലോണം പരിചയമുള്ള സംഭവമാവും റാഗി മുദ്ദേ. ഞാൻ ലോ ലതിനെ ഞങ്ങ കൃസ്ത്യാനികളുടെ പുന്നാരപ്പലഹാരമായ ‘പിടി’ യുമായി മിക്സ് ചെയ്ത് ഒരു പിടി പിടിക്കാൻ നോക്കീതാണ് ഈ ഫ്യൂഷൻ മുദ്ദെ. സംഭവം സിം‌പിളാണ്. റാഗിപ്പൊടീം ഉപ്പും ശകലം ജീരകവും തേങ്ങ ചിരണ്ടാൻ മടിയില്ലേൽ ഇത്തിരി തേങ്ങയും നന്നായി മിക്സ് ചെയ്യുക. ഞാൻ ഇതിന്റകത്തേക്ക് കുറച്ച് ഓട്സ് തവിടും കൂടെ ചേർ‌ത്തു കേട്ടോ. എന്നിട്ട് അടുപ്പത്ത് ഒരു പാത്രത്തിൽ കുറച്ച് വെള്ളം വച്ചു (റാഗിപ്പൊടീടെ അത്രേം അളവ് വെള്ളം മതി കേട്ടോ..അല്ലാതെ കളറും ചേർ‌ത്ത് പീച്ചാംകുഴലിലെടുത്ത് ഹോളി കളിക്കാനുള്ള പരുവത്തിലാക്കരുത് ) നന്നായി തിളച്ചു കഴിയുമ്പോൾ അതിലെക്ക് മോളിൽത്തെ മിക്സ് ശകലം ശകലം ചേർ‌ത്ത് നന്നായി ഇളക്കി വറ്റിക്കുക. (ഇത് നല്ലോണം സമയമുള്ള ആൾ‌ക്കാർക്ക്. എന്നെപോലുള്ളവരാണെങ്കിൽ എല്ലാം കൂടെ ഒനു മിക്സ് ചെയ്ത് ചെറുതീയിൽ വച്ച് വല്ല വഴിക്കും പോയി ഇടയ്ക്ക് വന്ന് ഒന്ന് ഇളക്കിക്കൊടുത്താൽ മതി). ഓക്കെ. എങ്ങനായാലും കുറച്ചു കഴിയുമ്പോൾ വെള്ളമൊക്കെ വറ്റി ഏതാണ്ട് കൊഴുക്കട്ടേടെ മാവിന്റെ കോലത്തിലുള്ള ഒരു മിക്സ് കിട്ടും. അതിനെ കുഞ്ഞു കുഞ്ഞു ഉരുളകളാക്കി ഉരുണ്ടു വീഴാത്ത ഏതേലും പ്രതലത്തിൽ വെയ്ക്കുക.(ഈ പ്രൊസസ്സിൽ നമ്മടെ കൈപൊള്ളാതിരിക്കാൻ വേറെ ആരെക്കൊണ്ടെങ്കിലും ഉരുള ഉരുട്ടിപ്പിച്ചാൽ മതി )

ചട്നിക്ക് ഒരു മുഴുത്ത സവാളേം ഒന്നുരണ്ടു തക്കാളീം ഇഞ്ചീം പച്ചമുളകും വെളുത്തുള്ളീം കറിവേപ്പിലേം ഉപ്പും ഇത്തിരി എണ്ണയൊഴിച്ച് ഒന്നു മൂപ്പിച്ച് എടുത്ത് മിക്സീടെ കിഡ്ഡീസ് ജാറിലേക്കിട്ട് അടിച്ചു ചമ്മന്തിയാക്കുക.ഇനിയെന്താ. ഒന്നാമത്തെ പാരഗ്രാഫിലെ മുദ്ദെ എടുത്ത് രണ്ടാമത്തെ പാരഗ്രാഫിലെ മിക്സീലിരിക്കുന്ന ചട്നീലു മുക്കി ശാപ്പിടുക. പ്ലേറ്റു കഴുകാൻ മെയ്‌ഡ് ഒക്കെ ഉള്ളവരാണെങ്കിൽ ഇതെല്ലാം കൂടി പ്ലേറ്റിലെടുത്തു വച്ചും തിന്നാം.അതൊക്കെ നിങ്ങടെ ഇഷ്ടം.പക്ഷെ എങ്ങനെ കഴിച്ചാലും മുദ്ദെ ശകലം പല്ലേൽ ഒട്ടുകേം ചെയ്യും ചട്‌നീടെ എരിവു കാരണം കണ്ണിലൂടെ തീ പറക്കുകേം ചെയ്യും. ബീ പ്രിപയേഡ്.

[Read More...]


Categories

Appam (11) Arabic (2) Beef (45) biriyani (27) Bread (2) Breakfast (7) Cake (47) Chicken (124) Chutney (5) Cooker (3) crab (3) Curry (3) Dessert (139) dosa (13) Drinks (38) Dryfish (2) Duck (10) Easter (6) egg (43) English (312) fish (95) fried rice (8) Halwa (8) Healthy (7) Icecream (1) Image (2) Jackfruit (1) Kabab (3) Lamb (3) LCHF (1) Liver (1) Malayalam (492) Mushroom (1) Mussel (5) mutton (21) Navaratri (2) Non-Veg (217) Noodles (3) oats (13) Onam (57) Paneer (3) Payasam (31) Pickle (28) Pizza (1) Pork (7) Prawn (39) pudding (25) Pulao (7) Ramadan (38) Rice (45) Salad (8) Sandwich (6) Sauce (1) Snacks (85) Soup (11) Squid (1) Tapioca (3) Tips (5) Turkey (3) veg (240) Video (1) Vishu (23) Wheat (2) Wine (9) Xmas (38) ചമ്മന്തി (3) മീൻ (1)

..

..

Download Android App

Download Android App
Ruchikoottu Android App
Return to top of page Copyright © 2011 | Platinum Theme Converted into Blogger Template by Keve Softs